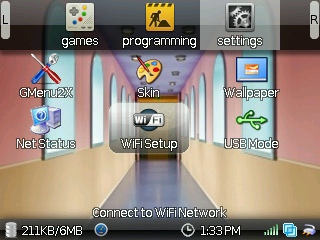
 The title of the post kinda sums it up. See the screen shot on the right? The icons on the bottom are all new and map to the new functionality. There’s even a signal meter on the bottom bar that let’s you know if your connected. You can download it here.
In addition to the gui changes, I made a couple of edits to minimize calls inside the main polling loop. I also moved the power management from gmenu2x and used my versions of bldaemon and ebindkeys to manage the backlights on the screen and keyboard. There’s still a couple of settings in gmenu2x for setting the levels, but the timers are all hard coded for now. Since the on-screen keyboard wasn’t really needed it was removed and replaced with an input dialog. The UI part was easy, but I had a hard time finding an SDL example that didn’t completely reinvent the keyboard, thanks to deeice on the irc board for providing some support. The updated source code is on github.
Installation instructions are the same as for NodeZ2, I even borrowed the install script and forgot to rename it, so it’s a bit misleading. Note: If you still have a ‘stock’ zipit mozzwald has created a very nice install script for flashing uboot and gmenu2x/openwrt:
FlashStock v0.1.2 Jun-28-2012 (md5 c6d01d4117b8492c5f57d41d81c34330)
As of version 5, mozzwald’s overlay scripts are included, be sure to read his blog posting for the details. Instructions for configuring the ZipIt opkg repository can be found here.
 What else is included? Gmu from wejp, a feature full mp3 player is the ‘goto’ app but I also have mpg123 included for situations when a lighter load is needed. Retawq, a text based web browser is very light and pretty easy to use.
The configuration for nano includes color, here are a few revised syntax files (Update: included in version 7).
A lot of the keyboard configs are from IZ2s that deeice has been perfecting. He also provides some scripts for emacs, an irc client, and a ‘320×240’ patch for htop.

As you can see from the main pic I also put a little UI on anarsoul’s USB mode drivers, it was almost a freebie after the groundwork for the wifi tools was laid. USB drivers, lots of em. I’ve only found one USB flash drive that I couldn’t read (and I didn’t even troubleshoot). All 5 or 6 of my USB hard drives connected, that includes the Western Digital MyBook that I couldn’t find the right setup for in the past.
There’s minicom and the drivers for using the ZipIt as a serial terminal as well as USB networking drivers for bridging or adding wifi to devices that don’t have it already. Batman and the scripts that are included in NodeZ2 are also there, I just need to make an icon, next release…
Hit the escape key while in gmenu2x and a menu will pop up that displays the hot keys. The one to remember is ‘alt+home (Update: as of ver7 it became just ‘home’)… it will return you to gmenu2x. Also, tryout the wakeup program, it can be quite useful. It’ll wakeup your ZipIt from suspend, or it can be used to suspend your process until it wakes up. It blocks until it goes off.
There are additional security features included as of version 7, but you will need to enable and configure them manually.
- adduser, addgroup
- deluser, delgroup
- /etc/busybox.conf <–provides sudo-like functionality
Follow these steps to set up a new user account and disable root logins over SSH.
root@engine12:~# mkdir /home
root@engine12:~# mkdir /home/mark
root@engine12:~# mkdir /home/mark/.ssh
root@engine12:~# adduser mark
root@engine12:~# chown mark -R /home/mark/
busybox needs to be SUID to switch to root with “su”
root@engine12:~# chmod 600 /etc/busybox.conf
root@engine12:~# chmod 4755 /bin/busybox
disable root login and restart dropbear
root@engine12:~# nano /etc/config/dropbear
root@engine12:~# /etc/init.d/dropbear stop
root@engine12:~# /etc/init.d/dropbear start
Troubleshooting
- If your ZipIt doesn’t boot after running the flash script the most likely cause is incorrect u-boot parameters.
You can check your settings from a u-boot prompt. Press a key after powering on the ZipIt, and at the prompt type printenv:
$ printenv
The correct bootargs should look something like:
bootargs “console=ttyS2,115200 fbcon=rotate:3 root=/dev/mtdblock3 rw rootfstype=jffs2”
To change the bootargs enter the following commands after the u-boot prompt.
$ setenv bootargs “console=ttyS2,115200 fbcon=rotate:3 root=/dev/mtdblock3 rw rootfstype=jffs2”
$ saveenv; reset
- After using certain apps you can no longer run a bash shell, all you get is a blank screen. The current solution is to press alt+tab. This will switch to the correct virtual terminal.
Building
Here are a few tips for setting up Codelite to browse and edit the gmenu2x source tree under OpenWrt.
- create a new custom Makefile project
- right click on the new project and select “import files from directory”
- select the gmenu2x source tree under <openwrt_root>/build_dir/target-arm_v5te_uClibc-0.9.32_eabi/
To build the changes I used the OpenWrt command-line. You always need to remove the .built flag in the build_dir first or the package will not be re-compiled.
<openwrt_root>/make package/gmenu2x/compile -j2 V=99
With additional effort you can configure Codelite to run the above command when instructed to build. Be sure not to issue a make clean or similar command though, OpenWrt will eagerly vaporize your efforts and overwrite them with a clean install of the gmenu2x tarball located in the dl folder.
