mark

GMenu2x update...

Uncategorized Comments Off on GMenu2x update…
Feb 232013

gmenu2x_22I should have this post broken up into several, so it’s going to get pretty long.  This version of the OpenWRT-ZipIt distro featuring GMenu2x is jammed with awesomeness.  And jammed is a pretty good word.  Not only is the rootfs compressed, but several binaries including gmenu2x have been upx’d to reduce even more space.  Additionally, with some smooth sleuthing by deeice from the irc #zipit channel, a few new switches were included in the build of the C++ based packages.  This removed some serious bloat, it really was amazing to see the reduction in size.  It was a huge win for the C++ lover too, as the code became equivalent in size to what C would produce.  So if you compare RC12 or prior to the latest version you’ll be floored when you find all the new apps and functionality that is now included in the flashed jffs2 rootfs.  There is over 1Mb in new stuff and still there remains  ~200Kb free for config files.  Installation instructions are the still same as for NodeZ2, and mozzwald also created a new version of the flash scripts to make the process even easier.

Most of the new apps, scripts, and functions revolve around the Links web browser and mpg123.  Besides normal graphical web browsing with SSL capability, Links has been configured to start playing Internet radio streams courtesy of mpg123.  There is also a choice to start StreamRipper directly from Links for the ease of collecting Internet streams to go, and if all that mp3 streaming and ripping is just ho-hum, there is an option to relay the tcp stream onto a multi-cast channel of your LAN.  Of course the ZipIt can also play that multi-cast stream, and it doesn’t get any easier to set this up, just turn it on/off like you would shuffle or repeat.  Multi-cast streaming works quite well over a B.A.T.M.A.N.  mesh network, I have a USB Ethernet dongle bring in an Internet stream which I then relay onto the wireless mesh interface.  And just in time for the cut, wej released a brand new 0.9.1 version of GMU that’s also included for a more elegant playback experience of mp3, ogg/vorbis, flac, speex, and wav formats.  The new version comes with a web server and two different interfaces for remote control.  The configuration is in /root/.config/gmu/gmu.zipit-z2.conf.  The Play/Stop/Prev/Next keys are configured to control GMU when it’s active.  See the Table of Hotkeys.
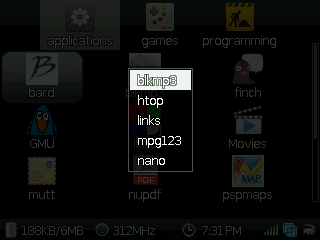
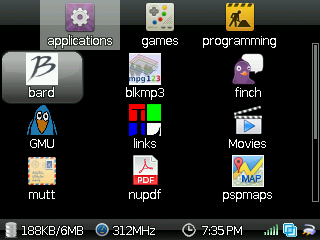
app_listMy favorite new feature is that Gmenu2x can now launch an app without closing, similar in experience to full scale systems.  As in prior versions, the Home key returns to Gmenu2X, but the action will now leave the current app running in the background.  It’s a really nice feature when combined with the zram driver, thanks go to mozzwald for the details on configuring zram in the Linux kernel.  When GMenu2x is active, pressing the Tab key will produce a list of running apps.  GMenu2x will switch to the selected apps’ controlling terminal.  Apps in the list can also be stopped instead, by using the BackSpace key on the selected item.  There are a few ways to navigate between the open virtual terminals.  The easiest way is to use the Home key to return to GMenu2x and then press Tab to show the list of running apps, then just select the one you want to switch to.  Alternatively, the Alt+Tab, Alt+LeftArrow and Alt+RightArrow key combos will increment and decrement the virtual terminal.
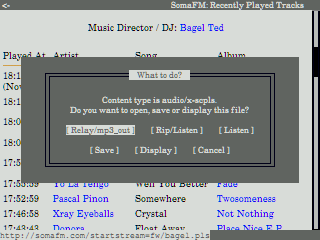
links2I primarily use the ZipIt to stream Internet radio from one of two different web sites, somafm.com and shoutcast.com.  SomaFM displays a playlist for the selected station that gets updated frequently, just make sure Auto-Refresh is enabled.  When a stream is chosen, Links will ask you how you want to handle it.  The first option to Relay/mp3_out is the most impressive, it will acquire the Internet stream and re-broadcast it onto a multi-cast channel of your LAN.  It makes setting up a multi-zone audio system a snap, and portable too.  After you select the stream and start broadcasting it, you can listen to it by opening blkMp3Player on any ZipIt that is connected to the network, press i for the ‘mp3_IN’ option and the stream should begin to playback.  With a little effort, you can synchronize playback across the ZipIts, be sure all of your ZipIts are set to run at the same CPU clock setting.  The Rip/Listen option receives a stream and also runs a tcp server that rebroadcasts it onto your LAN, it is set up to listen on the localhost only,  so that you can Rip and Listen.  See the script /usr/local/sbin/ripStream.sh to change configuration for the Rip/Listen option.  The third option starts up mpg123 and plays the stream.

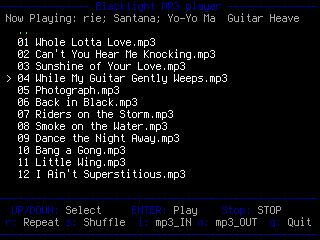
Becblkmp3ause I want the ZipIt’s Play and Stop buttons to control playback of the stream at anytime, in any program, system wide, I always run mpg123 in remote mode.  I patched mpg123 to be more aggressive and it now restarts an Internet stream that has lost connection, the Play button will pause and restart an Internet stream, even after a suspend.  Also notice that the +/- keys on the right side of the ZipIt will control the volume at all times.  The blkMp3Player app is a frontend for mpg123.  It will show a banner of the current playing Internet stream, but more useful is it’s ability to play a directory of mp3’s.  I added a notification callback to mpg123 so it can run in remote mode and still work with blkMp3Player.  When a track has ended mpg123 will notify blkMp3Player.  You can have more than one instance of blkMp3Player running and controlling a single mpg123, but since there isn’t a centralized playlist, the behavior is a little goofy.  Select the mp3_OUT option to multi-cast the playback onto your LAN or mesh network.
Links is configured to run in graphics mode, but it also can be started in text-only mode.  I have an entry in the mutt mailcap file that instructs Links to parse and display text-only versions of html mail, it’s a good feature to know about.  I set the user-agent to a value appropriate for mobile clients, but this will also prevent some sites from serving you a page.  Experiment with different values if you like.  Also something to try with Links is watching YouTube videos.  The ZipIt has been able to watch YouTube vids for some time now, mozzwald even has a custom ZipIt YouTube portal, I just added some scripts and configured Links to make it seamless.  You need to install movgrab and mplayer from the repo’s for this to work.

Most of the included apps have been set up to start the new way, with OpenNewVt set to true.  The setting can be found in the link properties dialog of GMenu2x.  A wrapper script is also needed for the app to be listed in GMenu2x.   The wrapper script should call ‘launch’ with parameters appropriate for the app.  The launch script will create entries in /tmp/vt and /tmp/apps and will clean up these entries when the application ends.  Read the script at /usr/local/sbin/launch to understand the parameters more thoroughly.  Also see some of the existing scripts for an example, grep the /usr folder for a list.  The script /usr/bin/links should be used as a template for launching SDL apps.  If starting a daemon use the launch.d version.

There isn’t a memory management system running that will protect you from starting too many apps, and doing so can really bog down or even lock-up the ZipIt.  The Home key should return you to GMenu2x, although it may take several minutes, rebooting may be a faster option.  The key combo of Alt+Home is also an alternative to consider in dire situations.  See the script at /usr/local/sbin/onAltHome for the details.

I updamuttted quite a few of the packages in the openwrt repos to make better and more consistent use of the keyboard.  This Table of HotKeys is formated for viewing with the ZipIt.  Be sure to install all of the apps on the list too.
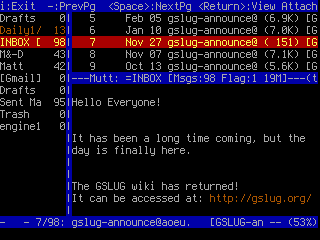
A worthwhile project is setting up the email client mutt.  There are config files included for using mutt with gmail but first install mutt_1.5.21-1_pxa.ipk and ssmtp from the repo.  Edit ~/.muttrc, /etc/ssmtp/ssmtp.conf, and /etc/ssmtp/revaliases.  There is excellent coordination of mutt, nano, Links, nupdf, and zgv when viewing email.  Using the enter, backspace, Tab, and Esc keys, you can navigate your email quite easily.  I also created nano keybindings that reflect more of the standard for word processing hotkeys.  Here’s a screen shot of mutt running with the split screen option enabled and the sidebar patch. Note the lack of ads in or around my email too.

htopThe two programs, bldaemon and ebindkeys are being started in inittab with special respawn tty’s.  The bldaemon in particular was going down unexpectedly so I had put that one on a respawn tty awhile back, but when I was working to solve the problem with Links and SDL crashing and locking the terminal, ebindkeys was also going down, so I gave it the same treatment.  The system requires two instances of ebindkeys, so I also created a pair of scripts to start them and make it easier to distinguish between the two when I need to restart one of them.  Start up htop to show what’s running.  The ‘F’ keys in htop are accessible by first pressing ‘f’ and then choosing the number, for example press and release ‘f’ then press Alt+w and htop will receive the F2 keystroke.  The patches and source code for the project can be found on my github page.

It should be noted that upx’d binaries do take much longer to start up than their non-compressed counterparts, so if you are setting up an overlay image to install packages to, you can speed up the start time of Links by installing Links via the repo with ovpkg.  Also check the following line in the script at /usr/local/sbin/ovmount

mount -t overlayfs -o rw,noatime,lowerdir=/${CHK_ROOT_DIR},upperdir=${dir} ${dir} /${CHK_ROOT_DIR}

The line above will configure the mounted overlay image to be the upper directory and requires that you have an SD card that is capable of writing.  If your SD card will not write then you should edit the script and change the line to read as follows.

mount -t overlayfs -o rw,noatime,lowerdir=${dir},upperdir=/${CHK_ROOT_DIR} ${dir} /${CHK_ROOT_DIR}

If you need help or have questions you can send me an email or ask for assistance on the freenode irc channel #zipit.

Video conferencing w/ ZipIts

Uncategorized Comments Off on Video conferencing w/ ZipIts
Jul 192012

Awhile back I was looking for a solution to send an mp3 stream out to multiple clients and then have the clients play it back synchronously.  After quite a bit of research, I decided to use the live555 library.  In the process of setting up the mp3 stream multicast, I realized the library was also the basis for a udp plugin to mjpg-streamer.  One thing led to another and pretty soon I was video conferencing with ZipIts.

Working off examples from the live555 source, I stitched together a working plugin for mjpg-streamer.  For the client I compiled mplayer to include the live555 codecs.  I now have an RTP video stream going, next up is voice.  Pretty simple right?  No, not really.  After lots of hacking on mplayer I managed to pick up an RTP speex stream only to be disappointed with a 20 second delay!  How could this be?  I have a 30 fps video feed coming in real time… WTF.  So I sat there, staring at the code, looking for that 20 second buffer….  I managed to get the delay down to about 2 secs, but that’s still way too long for holding a conversation.  Fortunately there’s the tcp side of the sockets api, and since the bandwidth consumed by the voice is really small, it works.  What I ended up with is a peer to peer video chat solution that runs on the Linux console using only the framebuffer.  The solution presented below is pretty raw.  I’ll probably write a script soon that automates the setup, but until then…

Note: The ‘client’ and ‘server’ users in the example commands represent separate ZipIts.  It’s assumed your network is configured.  The client address is 192.168.1.180, the server is 192.168.1.249

  • Load the modules needed for use of the webcam’s mic.

server@engine12:~# insmod snd-usbmidi-lib
server@engine12:~# insmod snd-usb-audio

  • Now we set-up the voice channel.  It’s a little backwards, so pay attention.  We run a program called TCPserver on what I am calling the client…

client@engine12:~# TCPserver 7080 | speexdec

server@engine12:~# arecord -D hw:1,0 -r 16000 -t raw -c 1 -f S16_LE |

speexenc | TCPclient 192.168.1.180 7080

Note: The argument “hw:1,0” is usually “hw:0,0” if your microphone is built-in, such as on a laptop

  • You should be able to hear now, using headphones on the client ZipIt.  To setup the video channel, start mjpg-streamer with the live555 output plugin and then connect to it with mplayer.

server@engine12:~# mjpg_streamer  -i “input_uvc.so -y -d /dev/video0 -r 320×240 -f 30”

-o “output_live.so -v -p 7072 -q 80”

client@engine12:~# cpu max

client@engine12:~# mplayer rtsp://192.168.1.249:7072/mjpg_streamer

-fps 30 -vo fbdev -vf scale=320:240,rotate=2


If all went well you should be able to see and hear the server’s webcam.  Now set up the webcam on the client the same way and start chatting with the other end, in my case it was just Bauer, but it does work with other people.  To use it over the web, add the -t switch.  You’ll need to configure your router to forward the two ports.  It’s possible to tunnel the communications using SSH and a usb ethernet dongle, but unfortunately I couldn’t get an SSH tunnel configured using the wifi interface.  I also setup a dynamic DNS account for each ZipIt in order to find each other over the web.

The live555 plugin has a lot more to offer when you add additional switches.  The -m switch multicasts the stream, you can then pick up the stream from multiple clients.  This is only going to work on your LAN, and actually works better over a B.A.T.M.A.N. mesh network.  The -a switch adds audio to the stream, albeit with a 2 sec. delay, but it’s still pretty useful for multicasting purposes.  If you add the -a switch you pick up the audio stream with my hacked version of mplayer and the TCP client/server utils aren’t needed.

The following parameters can be passed to the output_live.so plugin:

[-p | –port ]……….: port for this RTSP server
[-c | –credentials ]…: ask for “username:password” on connect
[-m | –multicast ]…: server will multicast (vs. unicast) — no args
[-q | –quality ]……: JPEG compression quality in percentn”
should match the quality value given to input_uvc
[-t | –tunnel ]……: port number for RTSP-over-HTTP tunneling
disabled if not specifiedn”
[-a | –audio ]……: stream audio
[-v | –video ]……: stream video


The source code for the project is located in three seperate repositories under my github account:

https://github.com/engine12/mjpg-streamer

https://github.com/engine12/mplayer

https://github.com/engine12/speex_tcp

Binaries for the ZipIt are here.


Gmenu2x with built-in WiFi tools

ZipIt Comments Off on Gmenu2x with built-in WiFi tools
Mar 312012

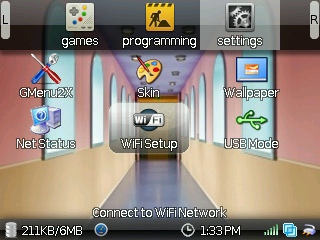
The title of the post kinda sums it up.  See the screen shot on the right?  The icons on the bottom are all new and map to the new functionality.  There’s even a signal meter on the bottom bar that let’s you know if your connected.  You can download it here.

In addition to the gui changes, I made a couple of edits to minimize calls inside the main polling loop.  I also moved the power management from gmenu2x and used my versions of bldaemon  and ebindkeys to manage the backlights on the screen and keyboard.  There’s still a couple of settings in gmenu2x for setting the levels, but the timers are all hard coded for now.  Since the on-screen keyboard wasn’t really needed it was removed and replaced with an input dialog.  The UI part was easy, but I had a hard time finding an SDL example that didn’t completely reinvent the keyboard, thanks to deeice on the irc board for providing some support. The updated source code is on github.

Installation instructions are the same as for NodeZ2, I even borrowed the install script and forgot to rename it, so it’s a bit misleading.  Note:  If you still have a ‘stock’ zipit mozzwald has created a very nice install script  for flashing uboot and gmenu2x/openwrt:

FlashStock v0.1.2 Jun-28-2012 (md5 c6d01d4117b8492c5f57d41d81c34330)

As of version 5, mozzwald’s overlay scripts are included, be sure to read his blog posting for the details.  Instructions for configuring the ZipIt opkg repository can be found here.

What else is included?  Gmu from wejp, a feature full mp3 player is the ‘goto’ app but I also have mpg123 included for situations when a lighter load is needed.  Retawq, a text based web browser is very light and pretty easy to use.

The configuration for nano includes color, here are a few revised syntax files (Update: included in version 7).

A lot of the keyboard configs are from IZ2s that deeice has been perfecting.   He also provides some scripts for emacs, an irc client, and a ‘320×240’ patch for htop.

As you can see from the main pic I also put a little UI on anarsoul’s USB mode drivers, it was almost a freebie after the groundwork for the wifi tools was laid.  USB drivers, lots of em.  I’ve only found one USB flash drive that I couldn’t read (and I didn’t even troubleshoot).  All 5 or 6 of my USB hard drives connected, that includes the Western Digital MyBook that I couldn’t find the right setup for in the past.

There’s minicom and the drivers for using the ZipIt as a serial terminal as well as USB networking drivers for bridging or adding wifi to devices that don’t have it already.  Batman and the scripts that are included in NodeZ2 are also there, I just need to make an icon, next release…

Hit the escape key while in gmenu2x and a menu will pop up that displays the hot keys.  The one to remember is ‘alt+home (Update: as of ver7 it became just ‘home’)… it will return you to gmenu2x. Also, tryout the wakeup program, it can be quite useful.  It’ll wakeup your ZipIt from suspend, or it can be used to suspend your process until it wakes up.  It blocks until it goes off.


There are additional security features included as of version 7, but you will need to enable and configure them manually.

  • adduser, addgroup
  • deluser, delgroup
  • /etc/busybox.conf    <–provides sudo-like functionality

Follow these steps to set up a new user account and disable root logins over SSH.

root@engine12:~# mkdir /home
root@engine12:~# mkdir /home/mark
root@engine12:~# mkdir /home/mark/.ssh
root@engine12:~# adduser mark
root@engine12:~# chown mark -R /home/mark/

busybox needs to be SUID to switch to root with “su”

root@engine12:~# chmod 600 /etc/busybox.conf
root@engine12:~# chmod 4755 /bin/busybox

disable root login and restart dropbear

root@engine12:~# nano /etc/config/dropbear
root@engine12:~# /etc/init.d/dropbear stop
root@engine12:~# /etc/init.d/dropbear start


Troubleshooting

  • If your ZipIt doesn’t boot after running the flash script the most likely cause is incorrect u-boot parameters.

You can check your settings from a u-boot prompt.  Press a key after powering on the ZipIt,  and at the prompt type printenv:

$ printenv

The correct bootargs should look something like:

bootargs “console=ttyS2,115200 fbcon=rotate:3 root=/dev/mtdblock3 rw rootfstype=jffs2”

To change the bootargs enter the following commands after the u-boot prompt.

$ setenv bootargs “console=ttyS2,115200 fbcon=rotate:3 root=/dev/mtdblock3 rw rootfstype=jffs2”
$ saveenv; reset

  • After using certain apps you can no longer run a bash shell, all you get is a blank screen.  The current solution is to press alt+tab.  This will switch to the correct virtual terminal.


Building

Here are a few tips for setting up Codelite to browse and edit the gmenu2x source tree under OpenWrt.

  • create a new custom Makefile project
  • right click on the new project and select “import files from directory”
  • select the gmenu2x source tree under <openwrt_root>/build_dir/target-arm_v5te_uClibc-0.9.32_eabi/

To build the changes I used the OpenWrt command-line.  You always need to remove the .built flag in the build_dir first or the package will not be re-compiled.

<openwrt_root>/make package/gmenu2x/compile -j2 V=99

With additional effort you can configure Codelite to run the above command when instructed to build.  Be sure not to issue a make clean or similar command though, OpenWrt will eagerly vaporize your efforts and overwrite them with a clean install of the gmenu2x tarball located in the dl folder.


Scripting the DirectFB

Uncategorized Comments Off on Scripting the DirectFB
Mar 162012

There is a new version of NodeZ2.  The biggest addition is a module for scripting the DirectFB within Node.js.  No browser required.  How cool is that!

It’s not very tested and there are holes in the implementation, but it’s still very functional.  Included are several example scripts that should get you going.  No cross compiler needed.

If you decide to flash it to the onboard memory beware, there is very little memory left in the jffs2 file system.  There is enough to store quite a bit of javascript, but if you opkg anything it should be directed to the overlayfs.

There is a problem with the keypad not working shortly after bootup.  Symptoms include not being able to use the alt key.  Until the problem is resolved you’ll need to work around it… suspend the ZipIt by pressing the power button, then wake it up by pressing power again.  This should get the keyboard working again.

NodeZ2_v4

To start one of the example scripts… cd to /root/node/dfb_examples and enter the following:

root@OpenWrt:~/node/dfb_examples# node df_window.js

Use the escape key to end the program.

Other new features include color syntax highlighting for javascript in nano.  You can add other syntax maps for bash or cpp files, but they’re not included by default.  I compiled nano to use the mouse too, but no luck.  Additional packages must be needed, I didn’t troubleshoot much.

The source for the new bindings is on github.


NodeZ2 is a tiny rootfs for the ZipIt Z2 designed to fit into the onboard flash memory.  It was created with the OpenWrt build system brought to the ZipIt by Projectgus… way to go bloke!

After flashing… the partition layout will leave ~1Mb of space for your Javascript web app, or other desired packages.  Additional packages can be added using the overlayfs and an SD card or USB memory.

Note: NodeZ2 will only start on a ZipIt that has the ‘U-Boot’ bootloader installed.

To flash NodeZ2 onto your ZipIt follow these steps:

  1. Download NodeZ2 (md5sum fa9b838736ad74f36533bc8896c60772)
  2. make an ext2 partition at least 20 MB in size, mount it then cd to the new partition
  3. unpack with the following command –>  root@OpenWrt:/# sudo tar -xjpvf ~/Downloads/NodeZ2_rc2.tar.bz2
  4. insert the SD card and boot the ZipIt
  5. After booting run    –> root@OpenWrt:/# /root/flash_NodeZ2.sh
  6. poweroff, remove the SD card, and boot the ZipIt
  7. change password     –> root@OpenWrt:/# passwd
  8. change mac address –> root@OpenWrt:/# nano /etc/config/wireless (option ‘disabled’ should be ‘1’)


*******   WiFi settings can be configured by pressing the ‘Home’ key followed by ‘c’  *******

Included packages:

B.A.T.M.A.N mesh networking

configure your meshnode with the included batconnect script

root@NodeZ2:/# batconnect zipit 2412 192.168.11.235 <— yields a static IP on channel 1

Node.js server side Javascript

root@NodeZ2:/# node /root/webserver.js to start the example

**use nano to edit and create new scripts

tmux terminal multiplexer

root@NodeZ2:/# readme for a list of hotkeys to use

mjpg_streamer webcam streaming server

root@NodeZ2:/# startWebCam (uvc webcam and USB mod required)

mpg123 mp3 player (also plays shoutcast streams)

root@NodeZ2:/# mpg123 -b 1024 http://ice.somafm.com/groovesalad


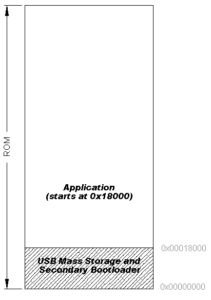
One of my dev boards is an LPC2378-STK.  It’s a fun board but, the JTAG programming interface for it is dreadfully slow.  I messed around a bit and learned that programming the flash memory with the iap interface was the way to go.  It was taking around 18 secs to write a sector with the isp interface, while almost instant when using iap.  In order to make use of the iap programming interface a secondary bootloader needs to be present in flash.

SD Secondary Bootloader

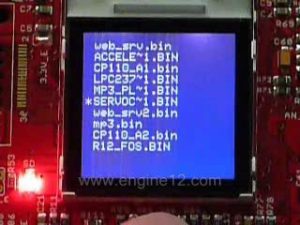
There’s a number of choices for implementing a secondary bootloader on the LPC2378-STK, ethernet, usb, and SD/MMC are available.  I chose the SD/MMC route.  The board also includes an LCD, and joystick.  I made use of these and added functionality to select from a list, the program that I want to load into flash.  The list is displayed on the boards LCD and represents the programs stored on the SD card.


USB Mass Storage

To populate the SD card with the programs, I set up the USB to act as a mass storage device.  The board shows up automatically under Linux and Windows.  I used the LPC_USB project to get started and coupled the result with Chans FAT for file system functions.  I found good examples for the SD/MMC interface from Martin Thomas.  For some reason I was using Windows at the time…  anyway, the JTAG I was using didn’t like the board getting reset.  I solved the problem with a bat file and a gdb script that assist with transferring the image to the SD card and resetting the JTAG.  They are included in the source package.  If your host is Linux, I’ll assume you can write your own script.  Note, everything works *much* better on Linux, even inside a VM.


Linking

The object code must be linked with respect to its location in flash.  Additionally the exception vectors need to be loaded into high memory in the startup script.  The ReadMe file in the source package includes a linker script for use with the GNU toolchain and startup assembly for building a project that can be launched with the bootloader.


http://engine12.com/files/lpc2378-stk/USB_Bootloader.zip

http://gandalf.arubi.uni-kl.de/avr_projects/arm_projects/

http://elm-chan.org/fsw/ff/00index_e.html

http://sourceforge.net/projects/lpcusb/


Back in December ZipIts were selling for $9.99 on amazon.  It seemed like way too good a deal to be true, but I couldn’t resist the urge to get one, they have so many features that interest me.  I figured it was worth the risk.  I received the ZipIt, installed Linux, and tested out the hardware.  Impressed as I was, I ordered 10 more.  One of the primary reasons for acquiring  this many ZipIts was to set up and experiment with a mesh network.  I’m not disappointed, the value of my Zipits went way up this past weekend!  This post describes the steps for configuring the ZipIt as a node on a mesh network.

As of Linux kernel 2.6.38 the batman-adv kernel module is in mainline.  Using buildroot I configured and built the kernel to include the module.  I cross-compiled the user land utility batctrl and installed it to the /usr/sbin directory of Z2Lite.

To set up a mesh network node, boot Z2Lite and issue the following commands.  I put them in a script file and assigned the script to a key in tmux.conf.  Be sure to kill the wpa-supplicant process if it’s running.

z2lite:~# modprobe batman-adv

z2lite:~# ifconfig wlan0 down

z2lite:~# ifconfig wlan0 mtu 1476
z2lite:~# iwconfig wlan0 mode ad-hoc
z2lite:~# iwconfig wlan0 essid zipit ap 02:1A:34:56:78:9A channel 1

z2lite:~# batctl if add wlan0

z2lite:~# ifconfig bat0 192.168.11.219
z2lite:~# ifconfig wlan0 up
z2lite:~# ifconfig bat0 up

Assign a unique AP mac address for each node (i.e. ZipIt) and choose a channel that best suits your environment.  That’s it, everything else is just like other IP networks, ping, ssh etc.  The batctl utility has a few commands for troubleshooting the network if you have issues.  I haven’t had time to experiment yet, but the first is going to be location triangulation.  I think it’s built into the protocol.


http://www.open-mesh.org/

http://hostwork.com/users/matt/zipitz2/

These are the steps for setting up a toolchain and SDK to cross compile GNU Linux for the Beagleboard ver. C4 (OMAP 3530).  The host is Ubuntu 10.04.  The toolchain is then used to cross compile the Codelite package.

Toolchain

Start by making a filesystem and SDK with Narcissus.  Be sure to include the option for the toolchain and X11 with xfce4.  Save and extract the SDK to the root / of the partition.
mark@ubuntu:~$ cd /
mark@ubuntu:/$ sudo tar -xfv /home/mark/Downloads/angstrom-SDK.tar.gz

This should create the folders:
/usr/local/angstrom/…
/var/lib/opkg/…

I made the following changes to the environment-setup script located in /usr/local/angstrom/arm/../environment-setup

-export PKG_CONFIG_PATH=$SDK_PATH/$TARGET_SYS${libdir}pkgconfig
+export PKG_CONFIG_PATH=$SDK_PATH/$TARGET_SYS/usr/lib/pkgconfig

alias gcc=”arm-angstrom-linux-gnueabi-gcc”
alias g++=”arm-angstrom-linux-gnueabi-g++”
alias as=”arm-angstrom-linux-gnueabi-as”
alias strip=”arm-angstrom-linux-gnueabi-strip”
alias ld=”arm-angstrom-linux-gnueabi-ld”

CORE_NUM=`cat /proc/cpuinfo | grep processor | wc -l`
alias make=”make -j$CORE_NUM”

Beagleboard rootfs install

Save the file system tar.gz that Narcissus generated and untar it to the SD partition.  There are a number of ways to boot the Beagleboard and the particulars of this step are not included.  Once Angstrom has booted, login as root and issue the following commands.

root:~# opkg install angstrom-x11-base-depends
root:~# startxfce4

Cross Compiling

The Codelite project requires the wxWidgets GTK libraries.
Get the wxWidgets source package from http://www.wxwidgets.org/downloads/
Untar and cd to the root of the wxWidgets folder

Prepare the shell for cross compiling by running the environment-setup script.  Don’t forget the period before /usr/…

wxWidgets-2.9.1$ . /usr/local/angstrom/arm/environment-setup
wxWidgets-2.9.1$ opkg-target update
wxWidgets-2.9.1$ mkdir build_gtk
wxWidgets-2.9.1$ cd build_gtk

Build wxWidgets with the Narcissus SDK:

build_gtk$ ../configure –enable-unicode –enable-debug –host=arm-angstrom-linux-gnueabi –with-gtk
build_gtk$ make -j2
build_gtk$ sudo make install

Build Codelite with Narcissus SDK:
Downloads$ svn co https://codelite.svn.sourceforge.net/svnroot/codelite/trunk codelite
Downloads$ cd codelite/
codelite$ ./configure –host=arm-angstrom-linux-gnueabi
codelite$ make -j2

Install on Beagleboard

Copy the wxWidgets libraries labled ‘libwx_xxx_xxxx.so’ to /usr/local/lib/ of the Beagleboard rootfs.  Also copy the codelite folder to a location on the Beagleboards rootfs.

Boot the Beagleboard and issue the following commands as root user.
root:~# echo “/usr/local/lib” >> /etc/ld.so.conf
root:~# ldconfig

You can either edit the Makefile and change the paths or delete it and reconfigure a new one.  I think it still needs to be edited even after a reconfigure iirc.

root:~# cd codelite

root:~/codelite# ./configure
root:~/codelite# make install

Codelite should now be up and running on the Beagleboard.


Links:

http://narcissus.angstrom-distribution.org/

http://prdownloads.sourceforge.net/wxwindows/wxWidgets-2.8.12.tar.gz

http://www.wxwidgets.org/downloads/

http://codelite.org/


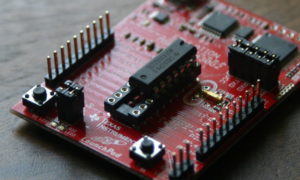
I transformed a simple helloworld C program into C++ classes.  I was able to match up one-to-one the C generated assembly to a C++ equivalent.  In this example, the benefit of using C++ code is limited to namespaces.  Hopefully you can see how the usage of C++ namespaces improves readability and assists in minimizing coding errors.  Most of the C code projects end up becoming so sloppy and full of pitfalls.  Using C++ allows your code base to be small and manageable across the spectrum of projects.  The code and makefile for the project are located here.  The project was compiled with the msp430gcc toolchain on a Ubuntu host.

Setting Up

Instructions for building the msp430 gnu toolchain are at hackaday.com.  Many sites claimed to setup the Launchpad for debugging with gdb and eclipse, but none worked for me. I was able to set up debugging in eclipse as follows.  If you don’t already have it, install the Zylin Embedded CDT plugin.  I have v14.15.1 installed in Galileo (Eclipse).  It’s assumed that you have the drivers properly configured for mspdebug and that you can communicate with the Launchpad using the mspdebug command line.

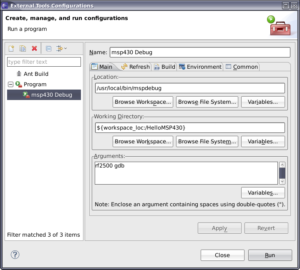
Run-> External Tools–> External Tools Configuration

Select the “Program” in the tree control of the left pane and then click the icon for “New Launch Configuration”

Fill in the dialog as shown.


Run->Debug Configurations

Create a new configuration under the tree heading –> Zylin Embedded Debug (Native)

Fill in the ‘main’ tab with the project name and point to the .elf of the application that you are going to debug.

Fill in the ‘debugger’ tab with the location of msp430-gdb.  For me this was “/opt/msp430-gcc-4.4.5/bin/msp430-gdb”.  The command line is empty.

Fill in the ‘commands’ tab with the following in the ‘initial’ section and a “continue” in the ‘run’ section:

set remoteaddresssize 64
set remotetimeout 999999
target remote localhost:2000

Code Differences

So now you have a makefile for C++ projects and a couple of basic MSP430 objects.

Notice the destructors are not virtual functions in the example code.  It’s unlikely you’ll be deleting static objects, so you can eliminate a bunch of unneeded code by declaring them this way. Since they will never be called, more code space is saved by removing them entirely.  My preferred solution would be editing the linker script and discarding the destructors section.

I tried to get as close to the original C generated assembly as I could.  This required some reworking of the timer header.  The functionality of the object is changed, but it’s a closer match to the original C code with only an 8 word difference.  The startup assembly script would need modification to make the code match up entirely.  Here are the listings for the generated assembly, C version and C++ version.

There is a great series on using the gnu tools for bare metal programming and C++ at www.eetimes.com.


Links:

http://hackaday.com/2010/08/11/how-to-launchpad-programming-with-linux/

https://github.com/Hack-a-Day/had_launchpad-blink/blob/30c9b4c926ec2dbcca923e75b1345ceb7f16498b/main.c

http://engine12.com/files/hellomsp430/

http://mspgcc4.sourceforge.net/

http://www.ti.com/launchpad

http://www.eetimes.com/design/embedded/4007119/Building-Bare-Metal-ARM-Systems-with-GNU-Part-1–Getting-Started

http://opensource.zylin.com/embeddedcdt.html

http://mspdebug.sourceforge.net/download.html


I configured one of my ZipIts to be a serial terminal for the beagleboard.  Like the ZipIt, the beagleboard has Uboot installed.  The flexibility of Uboot allows many different ways to get an image into RAM.  The methods available for the beagleboard require a serial connection.  Both methods outlined will require minicom to be installed on the ZipIt in order to communicate with the beagleboard.  The lrzsz package is also needed, it can sometimes be included in the minicom package, but double check in case it’s not.

z2sid-rc3:~#: apt-get install minicom

z2sid-rc3:~#: apt-get install lrzsz


My ZipIt was running z2sid-rc3 with a kernel built using this config in buildroot.


Method 1

I first connected the beagleboard to the ZipIt the same way I was connecting it to my laptop.  This setup requires a USB to serial converter, the usb-serial driver and minicom.  Lots of cables, but that’s how the beagleboard is configured by default, out of the box.  First of all, before plugging anything into the ZipIt’s USB, load the usb-serial driver.

z2sid-rc3:~#: modprobe usbserial

The USB hub can now be connected to the ZipIt.  Give the USB devices a second to register, a /dev/ttyUSB0 node will be created.  Attach a minicom session with the following command.

z2sid-rc3:~$: minicom -D /dev/ttyUSB0


Method 2

A little investigating and I was able to eliminate most of the wires and the USB hub by using USB serial over the beagle’s OTG port (in the prior setup, the OTG cable was only providing power).  This setup requires a different driver to be running on the ZipIt and the beagleboard’s Uboot environment variables need to be modified.  Start with changing the Uboot enviroment variables.  Enter Uboot and issue the following commands.  Note: this will require the setup from Method 1 in order to get a Uboot prompt on the ZipIt.

OMAP3 beagleboard.org # setenv usbtty cdc_ac

OMAP3 beagleboard.org # saveenv

OMAP3 beagleboard.org # reset

OMAP3 beagleboard.org # setenv stdout usbtty; setenv stdin usbtty; setenv stderr usbtty; saveenv

At this point Method 1 will no longer work on the beagleboard, as we have changed the stdin and stdout.

1.  Plug the ZipIt into AC power and boot z2sid-rc3.

2.  Load the cdc_acm driver with the following command.

z2sid-rc3:~#: modprobe cdc-acm

3.  Connect the beagleboard’s OTG cable to the ZipIt as shown in the picture for Method 2.

4.  There should be a new /dev/tttyACM0 node present now, attach minicom to it.

z2sid-rc3:~$: minicom -D /dev/ttyACM0


clonetty

The clonetty utility is needed for keeping minicom alive when plugging and unplugging the beagleboard.  It places a pseudo tty in between the ttyACM0 node and minicom.  The pseudo tty never goes down, and when the ttyACM0 node appears, clonetty takes care of setting up the link automatically.  The utility consists of a single C file and can be compiled with this make file.  I built mine right on z2sidx-rc3.  It’s assumed you have everything setup for Method 2.  These are the steps to set up clonetty and minicom.

1.  Plug the ZipIt into AC power, boot Linux.

2.  Connect the beagleboard’s OTG cable to the ZipIt as shown in the picture for Method 2.

3. Start minicom and configure the options to connect with the beagleboard (i.e. 115200 8N1), save as dfl and quit.

z2sid-rc3:~$: minicom -D /dev/ttyACM0 -o

4.  Start clonetty in the background.

z2sid-rc3:~$: clonetty /dev/ttyACM0 &

3.  Observe the output:

pty: /dev/pts/3
Using /dev/ttyACM0

4.  Attach minicom to the pty that clonetty just created.

z2sid-rc3:~$: minicom -p /dev/pts/3 -o

5.  You should now be able to unplug/plug or reset the beagleboard and the minicom connection will stay up.


omap-u-boot-utils

The omap-u-boot-utils package has source files needed for communicating with uboot and automating a serial transfer of an image into RAM.  There isn’t much OMAP specific code, the routines should work with any uboot’ed target.  This beagle_kermit.sh script uses the kermit method of serial transfer.  Start clonetty as described above, minicom is not needed.  Change to the directory with the omap-u-boot-utils and execute beagle_kermit.sh.  Note: the ‘port’ variable at the head of the script may need adjustment, it should match the output from clonetty.

z2sid-rc3:~/Uboot_utils$: ./beagle_kermit.sh


Links:

http://gitorious.org/clonetty

http://engine12.com/files/clonetty/Makefile

http://engine12.com/files/.config.04052011(usb_serial)

http://elinux.org/U-boot_musb_gadget_support

http://zipit.markamber.co/z2sid_v6_uboot_rc3.tar.bz2

http://code.google.com/p/omap-u-boot-utils/

© 2016 engine12