 I should have this post broken up into several, so it’s going to get pretty long. This version of the OpenWRT-ZipIt distro featuring GMenu2x is jammed with awesomeness. And jammed is a pretty good word. Not only is the rootfs compressed, but several binaries including gmenu2x have been upx’d to reduce even more space. Additionally, with some smooth sleuthing by deeice from the irc #zipit channel, a few new switches were included in the build of the C++ based packages. This removed some serious bloat, it really was amazing to see the reduction in size. It was a huge win for the C++ lover too, as the code became equivalent in size to what C would produce. So if you compare RC12 or prior to the latest version you’ll be floored when you find all the new apps and functionality that is now included in the flashed jffs2 rootfs. There is over 1Mb in new stuff and still there remains ~200Kb free for config files. Installation instructions are the still same as for NodeZ2, and mozzwald also created a new version of the flash scripts to make the process even easier.
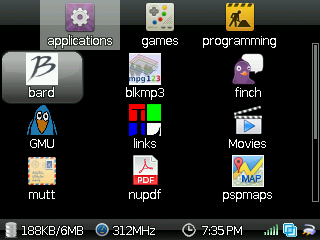
Most of the new apps, scripts, and functions revolve around the Links web browser and mpg123. Besides normal graphical web browsing with SSL capability, Links has been configured to start playing Internet radio streams courtesy of mpg123. There is also a choice to start StreamRipper directly from Links for the ease of collecting Internet streams to go, and if all that mp3 streaming and ripping is just ho-hum, there is an option to relay the tcp stream onto a multi-cast channel of your LAN. Of course the ZipIt can also play that multi-cast stream, and it doesn’t get any easier to set this up, just turn it on/off like you would shuffle or repeat. Multi-cast streaming works quite well over a B.A.T.M.A.N. mesh network, I have a USB Ethernet dongle bring in an Internet stream which I then relay onto the wireless mesh interface. And just in time for the cut, wej released a brand new 0.9.1 version of GMU that’s also included for a more elegant playback experience of mp3, ogg/vorbis, flac, speex, and wav formats. The new version comes with a web server and two different interfaces for remote control. The configuration is in /root/.config/gmu/gmu.zipit-z2.conf. The Play/Stop/Prev/Next keys are configured to control GMU when it’s active. See the Table of Hotkeys.
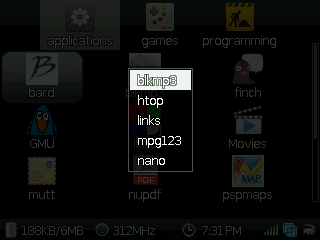 My favorite new feature is that Gmenu2x can now launch an app without closing, similar in experience to full scale systems. As in prior versions, the Home key returns to Gmenu2X, but the action will now leave the current app running in the background. It’s a really nice feature when combined with the zram driver, thanks go to mozzwald for the details on configuring zram in the Linux kernel. When GMenu2x is active, pressing the Tab key will produce a list of running apps. GMenu2x will switch to the selected apps’ controlling terminal. Apps in the list can also be stopped instead, by using the BackSpace key on the selected item. There are a few ways to navigate between the open virtual terminals. The easiest way is to use the Home key to return to GMenu2x and then press Tab to show the list of running apps, then just select the one you want to switch to. Alternatively, the Alt+Tab, Alt+LeftArrow and Alt+RightArrow key combos will increment and decrement the virtual terminal.
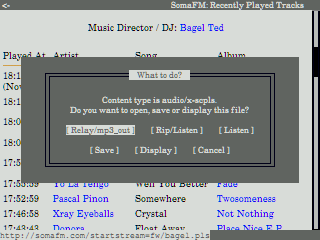 I primarily use the ZipIt to stream Internet radio from one of two different web sites, somafm.com and shoutcast.com. SomaFM displays a playlist for the selected station that gets updated frequently, just make sure Auto-Refresh is enabled. When a stream is chosen, Links will ask you how you want to handle it. The first option to Relay/mp3_out is the most impressive, it will acquire the Internet stream and re-broadcast it onto a multi-cast channel of your LAN. It makes setting up a multi-zone audio system a snap, and portable too. After you select the stream and start broadcasting it, you can listen to it by opening blkMp3Player on any ZipIt that is connected to the network, press i for the ‘mp3_IN’ option and the stream should begin to playback. With a little effort, you can synchronize playback across the ZipIts, be sure all of your ZipIts are set to run at the same CPU clock setting. The Rip/Listen option receives a stream and also runs a tcp server that rebroadcasts it onto your LAN, it is set up to listen on the localhost only, so that you can Rip and Listen. See the script /usr/local/sbin/ripStream.sh to change configuration for the Rip/Listen option. The third option starts up mpg123 and plays the stream.
Bec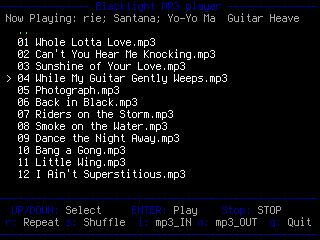 ause I want the ZipIt’s Play and Stop buttons to control playback of the stream at anytime, in any program, system wide, I always run mpg123 in remote mode. I patched mpg123 to be more aggressive and it now restarts an Internet stream that has lost connection, the Play button will pause and restart an Internet stream, even after a suspend. Also notice that the +/- keys on the right side of the ZipIt will control the volume at all times. The blkMp3Player app is a frontend for mpg123. It will show a banner of the current playing Internet stream, but more useful is it’s ability to play a directory of mp3’s. I added a notification callback to mpg123 so it can run in remote mode and still work with blkMp3Player. When a track has ended mpg123 will notify blkMp3Player. You can have more than one instance of blkMp3Player running and controlling a single mpg123, but since there isn’t a centralized playlist, the behavior is a little goofy. Select the mp3_OUT option to multi-cast the playback onto your LAN or mesh network.
Links is configured to run in graphics mode, but it also can be started in text-only mode. I have an entry in the mutt mailcap file that instructs Links to parse and display text-only versions of html mail, it’s a good feature to know about. I set the user-agent to a value appropriate for mobile clients, but this will also prevent some sites from serving you a page. Experiment with different values if you like. Also something to try with Links is watching YouTube videos. The ZipIt has been able to watch YouTube vids for some time now, mozzwald even has a custom ZipIt YouTube portal, I just added some scripts and configured Links to make it seamless. You need to install movgrab and mplayer from the repo’s for this to work.
Most of the included apps have been set up to start the new way, with OpenNewVt set to true. The setting can be found in the link properties dialog of GMenu2x. A wrapper script is also needed for the app to be listed in GMenu2x. The wrapper script should call ‘launch’ with parameters appropriate for the app. The launch script will create entries in /tmp/vt and /tmp/apps and will clean up these entries when the application ends. Read the script at /usr/local/sbin/launch to understand the parameters more thoroughly. Also see some of the existing scripts for an example, grep the /usr folder for a list. The script /usr/bin/links should be used as a template for launching SDL apps. If starting a daemon use the launch.d version.
There isn’t a memory management system running that will protect you from starting too many apps, and doing so can really bog down or even lock-up the ZipIt. The Home key should return you to GMenu2x, although it may take several minutes, rebooting may be a faster option. The key combo of Alt+Home is also an alternative to consider in dire situations. See the script at /usr/local/sbin/onAltHome for the details.
I upda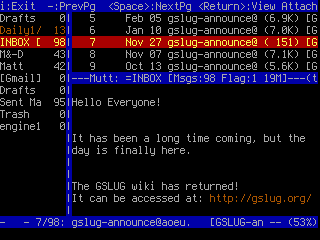 ted quite a few of the packages in the openwrt repos to make better and more consistent use of the keyboard. This Table of HotKeys is formated for viewing with the ZipIt. Be sure to install all of the apps on the list too.
A worthwhile project is setting up the email client mutt. There are config files included for using mutt with gmail but first install mutt_1.5.21-1_pxa.ipk and ssmtp from the repo. Edit ~/.muttrc, /etc/ssmtp/ssmtp.conf, and /etc/ssmtp/revaliases. There is excellent coordination of mutt, nano, Links, nupdf, and zgv when viewing email. Using the enter, backspace, Tab, and Esc keys, you can navigate your email quite easily. I also created nano keybindings that reflect more of the standard for word processing hotkeys. Here’s a screen shot of mutt running with the split screen option enabled and the sidebar patch. Note the lack of ads in or around my email too.
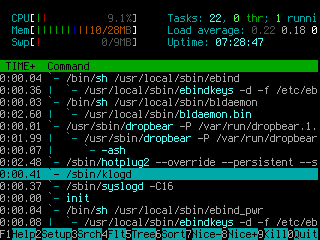 The two programs, bldaemon and ebindkeys are being started in inittab with special respawn tty’s. The bldaemon in particular was going down unexpectedly so I had put that one on a respawn tty awhile back, but when I was working to solve the problem with Links and SDL crashing and locking the terminal, ebindkeys was also going down, so I gave it the same treatment. The system requires two instances of ebindkeys, so I also created a pair of scripts to start them and make it easier to distinguish between the two when I need to restart one of them. Start up htop to show what’s running. The ‘F’ keys in htop are accessible by first pressing ‘f’ and then choosing the number, for example press and release ‘f’ then press Alt+w and htop will receive the F2 keystroke. The patches and source code for the project can be found on my github page.
It should be noted that upx’d binaries do take much longer to start up than their non-compressed counterparts, so if you are setting up an overlay image to install packages to, you can speed up the start time of Links by installing Links via the repo with ovpkg. Also check the following line in the script at /usr/local/sbin/ovmount
mount -t overlayfs -o rw,noatime,lowerdir=/${CHK_ROOT_DIR},upperdir=${dir} ${dir} /${CHK_ROOT_DIR}
The line above will configure the mounted overlay image to be the upper directory and requires that you have an SD card that is capable of writing. If your SD card will not write then you should edit the script and change the line to read as follows.
mount -t overlayfs -o rw,noatime,lowerdir=${dir},upperdir=/${CHK_ROOT_DIR} ${dir} /${CHK_ROOT_DIR}
If you need help or have questions you can send me an email or ask for assistance on the freenode irc channel #zipit.